Mastering Depth: How to Create Stunning 3D Multi-Layer Mountains Landscapes with Digital Cut Files
In the world of paper crafting, laser cutting, and digital design, flat surfaces are no longer the only option. Today’s creators are pushing boundaries by introducing dimensionality into their projects, transforming simple sheets of cardstock or wood into intricate, three-dimensional masterpieces. One of the most popular and visually striking techniques for achieving this depth is the 3D multi-layer mountains landscape. Whether you are a hobbyist looking to create unique wall art, a business owner seeking custom decor, or an educator teaching spatial geometry, understanding how to utilize these layered designs can elevate your creative output significantly.
This guide explores the intricacies of designing, cutting, and assembling multi-layer mountain landscapes using standard digital file formats like SVG, DXF, DWG, and EPS. We will break down why this technique is so effective, how to handle the technical aspects of scaling and layering, and provide practical tips for achieving professional results.
The Art of Layered Topography
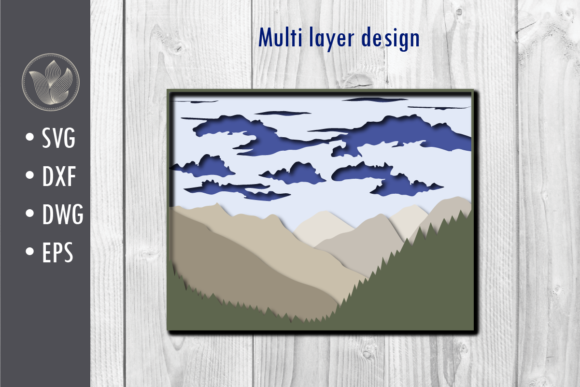
A 3D multi-layer mountains landscape is essentially a visual representation of terrain where each "layer" corresponds to a specific elevation contour. By stacking these layers on top of one another with small gaps in between, the eye perceives depth, creating a realistic illusion of a mountain range, valley, or canyon. This technique is not limited to just mountains; it can be adapted for oceans, city skylines, or abstract geometric patterns. However, the mountain landscape remains a favorite due to its organic beauty and the dramatic contrast it offers when backlit or viewed from different angles.
The significance of this design style lies in its versatility. It bridges the gap between traditional papercraft and modern digital fabrication. Unlike hand-cutting complex shapes that require steady hands and hours of precision, digital cut files allow for perfect repetition and accuracy. This democratizes high-quality design, making it accessible to anyone with access to a cutting machine like a Cricut, Silhouette, or a CO2 laser cutter.
Understanding Your Digital Assets
To successfully execute a 3D layered project, you must first understand the tools at your disposal. A complete design package typically includes multiple file formats, each serving a specific purpose in the workflow. When you purchase or download a design package, you should expect to receive a comprehensive set of files to ensure compatibility across different software and hardware.
The Essential File Formats
- SVG (Scalable Vector Graphics): This is the most common format for hobbyists using vinyl cutters. SVGs are vector-based, meaning they can be resized without losing quality. They are ideal for importing into software like Cricut Design Space or Silhouette Studio. An SVG file usually contains all the necessary paths for cutting, allowing you to separate layers easily within the software.
- DXF (Drawing Exchange Format): Widely used in CAD (Computer-Aided Design) programs, DXF files are the standard for laser cutters and CNC routers. If you are sending your design to a professional service bureau or using industrial machinery, the DXF format ensures that the dimensions remain precise. It is crucial for maintaining the exact scale required for the layers to fit together correctly.
- DWG (Drawing Window Format): Similar to DXF but native to Autodesk AutoCAD, the DWG file is preferred by architects and professional designers who work within the Autodesk ecosystem. It allows for more complex editing and annotation capabilities before the file is sent to production.
- EPS (Encapsulated PostScript): Often used in graphic design software like Adobe Illustrator, EPS files are excellent for printing and further artistic manipulation. They retain vector data while allowing for color separation and detailed editing of individual elements.
By having access to all four formats, you ensure that your project can move seamlessly from concept to creation, regardless of the equipment you choose to use.
Scaling and Proportions: The 11x14 Inch Standard
One of the key advantages of vector-based designs is their scalability. A typical 3D mountain landscape design might come in a standard size of 11x14 inches. This size is chosen because it fits perfectly within the maximum cutting area of many popular desktop cutting machines, such as the Cricut Maker or Silhouette Cameo 4. It also aligns well with standard framing sizes, making it easy to display the finished piece without additional mounting hardware.
However, the ability to scale is not just about fitting the machine; it is about controlling the visual impact. You can scale the design up to create a large statement piece for a lobby or down to create miniature models for dioramas. When scaling, it is important to remember that the relative proportions between the layers must remain constant. If you scale the entire file uniformly, the gaps between layers will scale proportionally, maintaining the structural integrity of the 3D effect.
Pro Tip: Always check the material thickness before finalizing your scale. If you are using thicker materials like 3mm basswood, the gaps between layers need to be larger than if you were using 0.2mm cardstock. Some advanced designs include "notches" or "tabs" that account for material thickness, ensuring a snug fit.
Assembly Techniques for a Seamless Finish
Receiving the files is only half the battle; the assembly process is where the magic happens. A well-designed 3D mountain landscape consists of 7 distinct layers. These layers are designed to be glued together, but the method of adhesion plays a critical role in the final look.
Choosing the Right Adhesive
For delicate paper crafts, a fine-tip glue bottle with a needle applicator is recommended. This allows you to apply tiny dots of adhesive to specific points, preventing warping or visible glue lines. For wooden or acrylic layers, strong cyanoacrylate (super glue) or epoxy resin may be necessary to ensure durability.
The Layering Process
- Cutting: Ensure your machine settings are calibrated for your specific material. Test cuts on scrap pieces are essential to determine the correct speed and pressure.
- Weeding/Removing Waste: Carefully remove the negative space from each layer. Use tweezers for small details to avoid tearing the material.
- Labeling: Number your layers from bottom to top (Layer 1 being the base). This prevents confusion during assembly, especially since the layers often look similar at a glance.
- Stacking: Apply adhesive to the designated contact points. Start with the bottom layer and build upwards. Use spacers (such as small beads of glue or dedicated standoffs) to maintain consistent gaps between layers. Consistency is key; uneven gaps will ruin the 3D illusion.
- Alignment: Check the alignment frequently. Misaligned layers can cause the structure to lean or collapse.
Common Misconceptions and Troubleshooting
Many beginners assume that 3D layered designs are difficult to assemble or require expensive specialized tools. In reality, with the right guidance and pre-made files, the process is straightforward. Another common misconception is that the design must remain static. While the primary goal is a stable 3D object, some designers experiment with movable layers or interactive elements, though this requires advanced engineering.
If your layers do not fit together, check the following:
- Scale Mismatch: Did you resize the file individually instead of grouping all layers and scaling them together?
- Material Thickness: Is your material thicker than the designer anticipated? Adjust your spacing accordingly.
- Burn Width: Laser cutters burn away a small amount of material. If your joints are too tight, the burned edges may prevent proper fitting. Consider slightly increasing the gap size in your software if you encounter this issue.
Applications Beyond Decoration
While wall art is the most obvious application, 3D multi-layer landscapes have broader uses. In education, they serve as excellent tactile aids for teaching geography, geology, and environmental science. Students can physically manipulate the layers to understand concepts like erosion, sedimentation, and elevation.
In the corporate world, these designs can be used for branded giveaways or office decor. Imagine a company logo transformed into a stylized mountain range, representing growth and stability. The ability to customize colors and materials allows businesses to align the design with their brand identity.
Conclusion
The 3D multi-layer mountains landscape is more than just a craft project; it is a testament to the power of digital design intersecting with physical creation. By leveraging versatile file formats like SVG, DXF, DWG, and EPS, creators can produce high-quality, scalable art that captivates viewers. With careful attention to scaling, material selection, and assembly technique, anyone can transform a flat sheet of material into a breathtaking three-dimensional world. Whether you are enhancing your home decor, enriching your classroom, or innovating your business branding, mastering this technique opens up a new dimension of creative possibility.